Should You Build Your Own Custom Infrared Sauna? Here’s What 10 Years of Experience Taught Me
Last week, a guy named Marcus called me at SaunaCloud. He’d been watching YouTube videos about DIY projects, had a free weekend coming up, and was convinced he could knock out a custom infrared sauna build in 48 hours.
I didn’t have the heart to tell him it was going to take a lot longer than that.
But here’s what I did tell him: “Marcus, I’m going to save you about three months of frustration and probably a few thousand dollars in mistakes. Let me walk you through what this actually looks like.”
That conversation is what inspired this post. Because after a decade of building infrared saunas—and watching hundreds of people attempt their own builds—I’ve learned exactly what works, what doesn’t, and what separates a mediocre DIY project from a therapeutic sanctuary you’ll use for the next 20 years.
The Question Nobody Asks (But Should)
Everyone asks me: “Can I build my own sauna?”
The better question is: “Should I build my own sauna?”
The answer depends entirely on what you’re trying to accomplish. Are you looking to save money? Create something customized to your exact vision? Learn a new skill? Or do you just want the fastest path to daily infrared therapy?
I’ve been obsessed with infrared saunas since 2014, when I built my first one in a cramped San Francisco apartment. That initial build was rough—I made every mistake in the book. Heaters placed too high. Inadequate insulation. Wood that warped within six months. But I learned, iterated, and eventually figured out what actually creates a therapeutic infrared experience.
Those early experiments became SaunaCloud, and we’ve now built over 3,000 custom saunas across North America. More importantly, I’ve consulted with hundreds of DIYers at various stages of their builds—some successful, many abandoned halfway through, and a few spectacular failures that required complete rebuilds.
So let’s talk honestly about what building your own custom infrared sauna actually entails.
What Makes a Custom Infrared Sauna Actually “Custom”?
Before we dive into whether you should build one, let’s clarify what we’re actually talking about.
A true custom infrared sauna means:
- Dimensions tailored to your exact space (not limited to prefab sizes)
- Wood selection based on your preferences and budget
- Heater configuration optimized for your body and goals
- Features you actually want (not what manufacturers decided to include)
- Aesthetic design that matches your home’s style
This is fundamentally different from buying a prefab kit from Amazon or a big-box store. Those are one-size-fits-all solutions built for the lowest common denominator. They might work for some people, but they’re not custom.
Building your own gives you complete control—but it also means complete responsibility when something goes wrong.
Why Custom Beats Portable Every Single Time
Let’s address the elephant in the room: portable infrared saunas.
You’ve seen them. Those tent-like structures with a hole for your head. Or the cramped wooden boxes that look like upright coffins. They’re cheap ($300-$800), they’re easy to set up, and they’re absolutely terrible if you’re serious about infrared therapy.
I get why people consider them. The price is attractive, and the marketing promises sound great: “Get all the benefits of a sauna without the commitment!” But here’s what they don’t tell you:
Portable saunas force you to compromise on everything that actually matters.
The Size Problem
Portable units are tiny by necessity. You’re crammed into a space barely large enough for one person, often sitting on a folding chair with your head sticking out the top. Forget bringing your partner in for a session together. Forget stretching out or getting comfortable. You’re basically sitting in a heated sleeping bag.
With a custom infrared sauna, you decide the size. Want a cozy 2-person unit for you and your spouse? Done. Need a 4-person sauna for your family? Easy. Want to be able to lie down during sessions? We can design for that. The space is yours to define.
The Quality Gap
Portable saunas use the cheapest possible heaters—usually low-wattage carbon panels or worse, simple heating elements wrapped in fabric. The EMF levels are often terrible (I’ve tested portable units emitting 80-150 milligauss), the heat distribution is uneven, and the therapeutic output is questionable at best.
When you build a custom infrared sauna, you choose professional-grade heaters. You select ultra-low EMF panels with proven therapeutic wavelengths. You position them strategically for 360-degree coverage. The difference in actual infrared penetration and cellular activation is massive.
The Experience Factor
Using a portable sauna feels like exactly what it is—a compromise. You’re sitting in a fabric tent or a cramped box, your head exposed to room temperature while your body overheats unevenly. It’s uncomfortable, claustrophobic, and honestly kind of depressing.
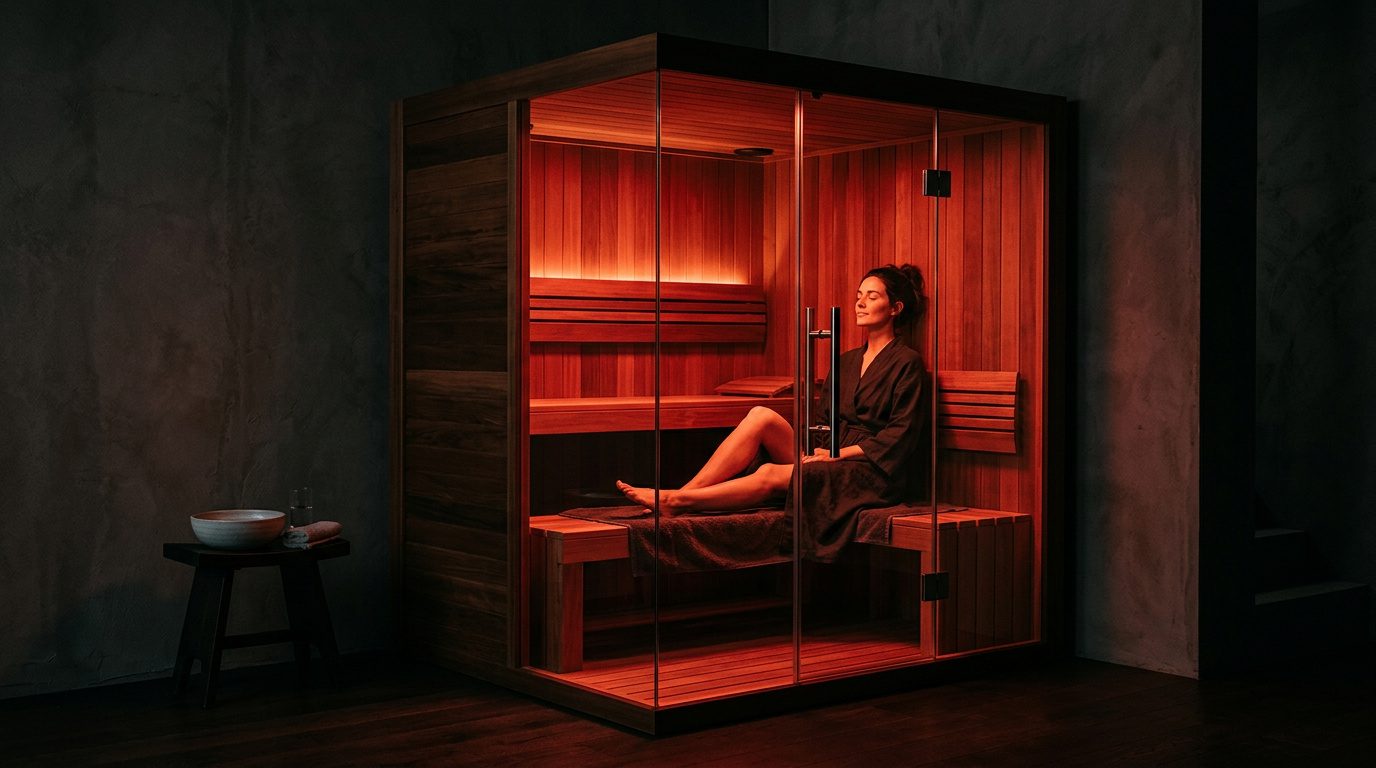
A custom infrared sauna is a sanctuary. Real Western Red Cedar surrounds you with natural aromatherapy. You can install proper lighting, add Bluetooth speakers, create the exact ambiance you want. You can design benches at the perfect height and depth for your body. You control every sensory element of the experience.
This matters more than people realize. If your sauna feels like a medical device or a punishment, you won’t use it consistently. If it feels like a spa retreat, you’ll look forward to it every day.
The Customization You Actually Want
Here’s what you can customize in a portable sauna: basically nothing. You get what the manufacturer decided to make.
Here’s what you can customize in a custom infrared sauna build:
- Exact dimensions to fit your space perfectly (basement corner, garage wall, outdoor shed)
- Bench configuration (L-shaped, parallel, tiered, lying benches)
- Wood type and grade (premium clear cedar, rustic knotty cedar, other species)
- Door style (glass for openness, solid cedar for privacy)
- Heater power and placement (optimized for your body and recovery goals)
- Lighting design (dimmable, color-changing, reading lights)
- Technology integration (Bluetooth speakers, chromotherapy, digital controls)
- Red light therapy (integrated benches for real therapeutic benefit)
- Ventilation system (passive or active, based on your environment)
- Exterior finish (stained, natural, matching your home’s aesthetic)
Every single element is a choice you make based on what matters to you. Not what a factory in China decided was “good enough.”
The Investment That Actually Pays Off
Yes, a custom infrared sauna costs more upfront. But let’s talk return on investment.
A $600 portable sauna might last 2-3 years before the fabric tears, heaters fail, or you just get tired of the terrible experience. Then you’re buying another one or finally investing in something real.
A quality custom infrared sauna lasts 20+ years. That’s thousands of sessions. When you break down cost per use, the custom build is actually cheaper long-term—and infinitely more effective therapeutically.
Plus, a custom sauna adds real value to your home. A portable tent in your closet? Not so much.
When Portable Makes Sense (Spoiler: Almost Never)
I can think of exactly three scenarios where a portable sauna might be appropriate:
- You’re traveling frequently and want infrared therapy on the road (even then, there are better options)
- You’re testing whether you’ll actually use sauna therapy before committing (fair, but know you’re not getting the real experience)
- You have absolutely zero space and zero budget for anything else (at which point, just join a gym with a sauna)
For everyone else—especially if you’re already considering building a DIY sauna—portable is settling for something you’ll eventually replace anyway.
If you’re going to invest the time to research, plan, and potentially build an infrared sauna, why settle for a portable compromise when you can create exactly what you want?
The Three Types of DIY Sauna Builders I’ve Met
Over the years, I’ve noticed people fall into three categories when it comes to DIY sauna projects:
The Weekend Warrior
This person has watched a few YouTube videos, has basic tool skills, and thinks building a sauna is like building a shed. They underestimate complexity, overestimate their skills, and usually give up when they hit the electrical phase.
Success rate: About 20%. Most abandon the project or end up hiring professionals to finish.
The Obsessive Researcher
This builder spends 6-12 months researching every detail. They join forums, read studies, compare heater specifications, and plan meticulously. When they finally start building, they actually know what they’re doing.
Success rate: About 70%. These folks usually create functional saunas, though they often wish they’d hired help for electrical work.
The Experienced Craftsperson
This person has serious carpentry experience, understands electrical systems, and approaches the project like any other skilled build. They respect the process, take their time, and produce quality work.
Success rate: About 90%. The main challenges are usually material sourcing and heater selection rather than construction quality.
Which type are you? Be honest, because it determines whether DIY is actually your best path forward.
The Real Timeline (Not the YouTube Version)
Let me give you the timeline nobody talks about.
YouTube videos show time-lapse builds that make everything look easy. “I built my sauna in a weekend!” Cool story. Here’s what they’re not showing you:
Weeks 1-2: Planning and Design You’re measuring your space repeatedly, sketching layouts, researching materials, and making decisions about everything from door placement to heater configuration. If you’re like most people, you’ll change your mind at least three times.
Weeks 3-4: Material Sourcing Finding quality Western Red Cedar isn’t as simple as walking into Home Depot. You’ll visit specialty lumber yards, compare prices, check moisture content, and probably drive to multiple locations. Then there’s insulation, vapor barrier, electrical components, heaters, control systems, and hardware.
Weeks 5-7: Frame and Insulation The actual framing goes relatively quickly if you have carpentry skills. Insulation takes longer than expected because precision matters here—gaps in your vapor barrier will haunt you later.
Weeks 8-10: Electrical Work This is where many DIY projects stall out. Running a 240V dedicated circuit from your panel to the sauna location isn’t trivial. You need permits, inspections, and if you’re not confident with electrical work, this is when you call a licensed electrician.
Weeks 11-14: Cedar Installation Cutting, fitting, and installing tongue-and-groove cedar is meditative but time-consuming. Each board needs to fit precisely, and you’ll probably remake a few cuts. This phase separates people who enjoy the process from those who just want results.
Weeks 15-16: Heaters and Benches Mounting heaters correctly requires understanding placement, wiring, and safety clearances. Building comfortable benches that won’t warp takes carpentry skills and patience.
Weeks 17-18: Final Assembly and Testing Installing doors, lighting, controls, and accessories. Then comes the crucial testing phase where you discover what you got wrong and need to fix.
Total realistic timeline: 4-5 months working evenings and weekends.
Can it be done faster? Sure. But rushed builds lead to mistakes that cost more to fix than they would have to prevent.
Let’s Talk Money (The Uncomfortable Part)
Everyone wants to save money. That’s usually the primary motivation for DIY. But let’s break down what you’re actually saving—and what you’re risking.
Materials Cost Breakdown
For a quality 2-person custom infrared sauna (approximately 5×4 feet):
- Premium cedar lumber: $1,800-$2,800
- Quality infrared heaters: $1,200-$2,200
- Insulation and vapor barrier: $400-$600
- Electrical components: $500-$800
- Control system: $200-$500
- Tempered glass door: $600-$1,000
- Benches and hardware: $300-$500
- Lighting and accessories: $200-$400
Total materials: $5,200-$8,800
Now add in the tools you don’t already own (saw, level, electrical tester, etc.) and you’re looking at another $300-$800.
The Hidden Costs Nobody Mentions
Your time: If you value your time at even $25/hour and spend 100 hours building, that’s $2,500 in opportunity cost.
Mistakes and do-overs: Plan for at least $500-$1,000 in materials you’ll mess up and need to replace. Everyone makes cutting errors, buys the wrong size components, or needs to redo sections.
Electrical inspection and permits: $150-$400 depending on your municipality.
Tools and equipment rental: If you don’t own everything you need, factor in another $200-$400.
So what’s your actual total cost?
Most successful DIY builds end up costing $7,000-$11,000 when you factor everything in. Compare that to professional builds ($10,000-$18,000) and the savings are real but not as dramatic as people assume.
The bigger question: What’s your time and stress worth? Only you can answer that.
Why Red Light Therapy Changes Everything
Here’s where I want to shift gears and talk about something most DIY builders don’t even consider: integrating red light therapy into your custom infrared sauna.
This addition transformed how I think about sauna design, and it’s become the feature our customers rave about most. But understanding why requires diving into some science.
The Cellular Magic of Red Light
Red light therapy (photobiomodulation) uses specific wavelengths—630nm red light and 850nm near-infrared—to literally activate your cellular powerhouses. When these wavelengths penetrate your skin, they’re absorbed by mitochondria, the energy factories in your cells.
This absorption triggers a cascade of beneficial effects:
ATP Production Increases: Your cells produce more energy, which means faster healing, better function, and improved performance across every system in your body.
Inflammation Decreases: Red light reduces inflammatory markers like cytokines while increasing anti-inflammatory compounds. This is huge for anyone dealing with joint pain, muscle soreness, or chronic inflammatory conditions.
Collagen Production Amplifies: Fibroblasts in your skin get activated, producing more collagen and elastin. This isn’t just vanity—it’s actual tissue repair and skin barrier improvement.
Circulation Improves: Red light stimulates nitric oxide production, which dilates blood vessels and improves oxygen delivery throughout your body.
The research here is solid. We’re talking thousands of peer-reviewed studies showing measurable benefits for everything from wound healing to athletic recovery to cognitive function.
The Distance Problem Most Saunas Get Wrong
Here’s the critical issue with red light in infrared saunas: most companies are doing it completely wrong.
Walk into any sauna showroom and you’ll see red light panels mounted on the walls, 24-36 inches away from where you sit. It looks cool. It glows red. And it’s almost therapeutically useless.
Red light follows the inverse square law—the intensity of light decreases exponentially with distance. At 6 inches from the source, you’re getting 100% of the therapeutic dose. At 12 inches, you’re down to 25%. At 24 inches? You’re getting maybe 10-12% of the beneficial wavelengths actually penetrating your tissues.
For red light therapy to work, the LEDs need to be within 6 inches of your skin. Period.
This is where most DIY builders and even many professional sauna companies fail. They mount panels for aesthetics rather than effectiveness.
The Red Light Bench Solution
At SaunaCloud, we spent three years solving this problem. The answer was obvious once we stopped thinking about red light panels as wall decorations and started thinking about them as therapeutic devices.
We integrated red light panels directly into the bench seating.
Think about it: When you sit on the bench, which parts of your body are consistently within 6 inches of a surface? Your hamstrings, glutes, lower back, and if designed correctly, your calves and feet.
These are exactly the muscle groups that carry the most tension, inflammation, and soreness in most people:
- Runners and cyclists: hammered hamstrings and glutes
- Desk workers: chronic lower back tension
- Athletes: quad and calf tightness
- Everyone: general lower body inflammation from daily activity
By positioning red light where you’re actually sitting, we deliver therapeutic wavelengths exactly where they’re needed most.
Infrared + Red Light: The Synergistic Effect
When you combine far-infrared heat with properly positioned red light therapy, something remarkable happens—the benefits multiply.
Infrared heat increases blood flow and opens capillaries. This means more oxygen and nutrients are flowing through tissues that are simultaneously being stimulated by red light. The cellular activation from red light is enhanced by the improved circulation from heat.
It’s like the heat creates the highway system and red light provides the cargo trucks delivering healing to every cell.
Our customers report significantly faster recovery times, better sleep quality, and noticeable improvements in muscle soreness compared to using infrared heat alone.
Can You DIY a Red Light Bench?
I’ll be honest: this is where DIY gets extremely complicated.
Adding red light therapy to your custom infrared sauna build requires:
- Medical-grade LED panels with verified wavelengths (not cheap Amazon lights)
- Custom bench construction that positions panels 4-6 inches from skin contact
- Heat management (LEDs generate heat and you’re operating in an already hot environment)
- Electrical integration (additional circuit load calculations)
- Waterproofing and moisture protection for electronics
- Control systems that operate red light independently from infrared heaters
Most DIY builders don’t attempt this because it requires electrical expertise and precision fabrication that’s beyond typical woodworking skills.
If red light therapy is important to you—and after everything I’ve seen, I think it should be—this might be the deciding factor that tips you toward professional installation rather than DIY.
Want to learn more about the science and benefits? Check out our comprehensive guide on red light infrared saunas.
The Mistakes I Made (So You Don’t Have To)
My first sauna build was a disaster in slow motion. Here are the mistakes that cost me the most:
Mistake #1: Buying Cheap Heaters
I went on Amazon and bought “infrared sauna heaters” for $400. They looked identical to the $1,200 professional models. Spoiler alert: they weren’t.
The heat output was weak, they emitted high EMF (I tested at 80+ milligauss), and one failed within eight months. I ended up replacing all of them.
The lesson: Heaters are the heart of your sauna. This is not where you save money.
Mistake #2: Skimping on Insulation
I figured R-7 insulation would be “good enough” since the space was small. Wrong. My sauna took 45 minutes to heat up and struggled to maintain temperature. After adding proper R-13 insulation and vapor barrier, heat-up time dropped to 20 minutes.
The lesson: Insulation determines your sauna’s efficiency and effectiveness. Do it right the first time.
Mistake #3: Mounting Heaters Too High
I placed heaters at eye level because I thought heat rises so higher is better. This left my legs and feet cold while my upper body roasted. I had to completely remount everything.
The lesson: Heater placement is science, not guesswork. Study optimal configurations before drilling holes.
Mistake #4: Using the Wrong Wood
I mixed cedar with cheaper pine to save money. The pine sections warped badly and started releasing sticky resin when heated. I had to replace entire wall sections.
The lesson: Use quality cedar throughout. No exceptions.
Mistake #5: DIY Electrical Work (Without Knowledge)
I thought I could handle the electrical myself. I was wrong. My circuit breaker kept tripping, and when I finally had an electrician inspect it, he found multiple code violations that could have caused a fire.
The lesson: Hire a licensed electrician unless you genuinely know what you’re doing.
When DIY Makes Sense (And When It Doesn’t)
After helping hundreds of people navigate this decision, here’s my honest assessment:
DIY Makes Sense If:
✅ You have genuine carpentry and basic electrical knowledge
✅ You actually enjoy complex projects and have 80-120 hours to invest
✅ You have access to quality materials at reasonable prices
✅ You’re comfortable with problem-solving and troubleshooting
✅ You’re not interested in advanced features like integrated red light therapy
✅ You want the satisfaction of building something yourself
Professional Installation Makes More Sense If:
✅ Your time is limited or extremely valuable
✅ You want guaranteed results without trial and error
✅ You’re interested in features like red light benches
✅ You lack electrical expertise
✅ You want warranty protection on everything
✅ You value peace of mind over cost savings
There’s no wrong answer here. I’ve seen incredibly successful DIY builds and I’ve seen people waste months of their life on projects they should have hired out.
The Alternative Path: Semi-Custom Builds
Here’s an option most people don’t consider: buying components from professionals but handling installation yourself.
At SaunaCloud, we offer this option. We’ll design your sauna, provide professional-grade heaters, pre-cut cedar components, and detailed installation plans. You handle the assembly and installation, potentially with a local handyman or electrician.
This approach gives you:
- Professional-quality components at better prices than retail
- Expert design guidance on layout and configuration
- Warranty protection on heaters and electrical systems
- Reduced labor costs while avoiding DIY material mistakes
- The satisfaction of building something yourself with professional support
It’s the middle ground between full DIY and turnkey installation.
For more detailed technical guidance, check out our ultimate guide to building your own custom infrared sauna.
What I’d Do Differently If I Started Over
If I were building my first custom infrared sauna today with everything I know now, here’s exactly what I’d do:
1. Start with professional heaters: I’d budget $1,500-$2,000 for quality, ultra-low EMF heaters with proven performance. This isn’t negotiable.
2. Over-insulate: I’d use R-13 everywhere plus extra attention to sealing the vapor barrier. Heat retention is everything.
3. Hire an electrician immediately: No DIY electrical work. Period. It’s worth the $500-$800 for professional installation.
4. Plan heater placement obsessively: I’d mock up the layout with cardboard boxes before drilling a single hole.
5. Buy extra cedar: I’d order 15% more lumber than calculated to account for mistakes, variations, and waste.
6. Integrate red light from the start: Rather than retrofitting later, I’d build the benches with red light integration from day one—or hire someone who knows how.
7. Take my time: I’d spread the project over 3-4 months and enjoy the process rather than rushing to finish.
The Question Marcus Actually Needed to Answer
Remember Marcus from the beginning of this post? After our conversation, I asked him one question that changed his perspective:
“Marcus, why do you want a sauna?”
He paused. “I want to feel better. My back pain is killing me, I’m not sleeping well, and I need something to help me recover from workouts.”
“Okay,” I said. “So the sauna is the tool, not the goal. The goal is feeling better. Does it matter whether you build it yourself or hire someone, as long as you’re using it daily six months from now?”
Long pause.
“I guess when you put it that way, not really.”
That’s the real question. Are you building a sauna because you love the construction process, or because you want the health benefits? If it’s the latter, the fastest path to daily use might not be DIY.
Marcus ended up ordering a custom sauna from us. He’s been using it every night for eight months and says it’s the best health decision he’s ever made. Could he have built it himself? Probably. Would he have actually finished it? Maybe. Would he be eight months into daily therapeutic sessions right now? Unlikely.
My Final Take After a Decade in This Business
Building your own custom infrared sauna is absolutely possible. I did it. Thousands of others have done it successfully. You can too.
But success requires honest self-assessment about:
- Your actual skill level (not aspirational skill level)
- The time you realistically have available
- Your budget for both materials and inevitable mistakes
- Whether you genuinely enjoy complex building projects
- What you’re actually trying to achieve
If you have the skills, time, and patience—and you enjoy the process—DIY can be incredibly rewarding. You’ll save money, learn valuable skills, and have the satisfaction of building something significant with your own hands.
But if your goal is simply to access daily infrared therapy as quickly as possible, professional installation might get you there faster and with better results.
Either way, the important thing is making it happen. Whether you build it yourself or work with professionals like us, getting a quality infrared sauna into your life will change how you feel, sleep, recover, and show up in the world.
I’ve been using mine daily since 2014. It’s the single best health investment I’ve ever made, and I want the same for you.
Ready to Make Your Decision?
If you’re leaning toward DIY, start with these resources:
- Custom infrared sauna design principles
- DIY infrared sauna technical guide
- Outdoor sauna considerations
If you’re interested in professional builds or semi-custom options:
Or just pick up the phone and call me. Seriously. I talk with DIYers and prospective customers every week, and I’m happy to give you honest guidance regardless of which direction you go.
📞 800-370-0820
📧 hello@saunacloud.com
The hardest part of any project is starting. Everything else is just problem-solving along the way.
— Chris Kiggins
SaunaCloud Founder
Still Using My Sauna Every Single Night
P.S. — If you found this helpful, check out my book The Definitive Guide to Infrared Saunas where I dive even deeper into the science, benefits, and technical details of infrared therapy.