How to Build a Custom Infrared Sauna: The Engineer's Guide (2026)
Key Takeaways
- Most DIY guides use watts-per-cubic-foot — the wrong formula for infrared. Infrared heats body surfaces, not air. The real variables: heater proximity, coverage angle, and the inverse square law
- A heater 6 inches away delivers ~4x the therapeutic dose as one at 12 inches (inverse square law). This is why SaunaCloud's Atlas™ system positions heaters for 360° coverage
- SaunaCloud's kit model: custom plans + VantaWave® heaters + CORE 5™ power supply + pre-cut cedar + phone/video support. Your contractor installs in 1-3 days
- Custom infrared saunas fall under NEC Article 424 (Fixed Electric Space Heating), not Article 422 (Appliances). SaunaCloud's code expert Chad speaks with your inspector directly
- The five costliest DIY mistakes — DIY electrical ($2K-$5K), wrong insulation ($3.2K), cheap heaters (reduced benefit for 15+ years), no vapor barrier ($10K-$30K mold), poor placement (permanent) — cost more to fix than doing it right
Last week, a guy named Marcus called me at SaunaCloud. He'd been watching YouTube videos, had a free weekend, and was convinced he could build a custom infrared sauna in 48 hours. I didn't have the heart to tell him it was going to take a lot longer than that.
But here's what I did tell him: 'Marcus, I'm going to save you about three months of frustration and probably a few thousand dollars in mistakes. Let me walk you through what this actually looks like.'
I've built over 3,000 custom infrared saunas since 2014 — for homes, hotels, gyms, and wellness centers. I've also been called to fix dozens of failed DIY builds. The pattern is always the same: someone follows a generic online guide that says 'calculate watts per cubic foot, buy cedar, hire an electrician' — and they end up with a warm box that doesn't deliver therapeutic results.
This guide is different because it starts from engineering principles, not a parts list. I'm going to explain the physics that make an infrared sauna actually work — the inverse square law, heater coverage geometry, control system architecture — and then show you how those principles translate into construction decisions.
Why 'watts per cubic foot' is the wrong formula for infrared saunas
Every DIY guide online tells you to calculate heating requirements the same way: measure cubic footage, multiply by 10-15 watts per cubic foot. This formula works for traditional saunas because they heat air — and air volume is the relevant variable.
Infrared saunas don't heat air. They radiate electromagnetic energy that passes through air and is absorbed directly by your body. The real variables that determine therapeutic effectiveness are:
1. Heater proximity — infrared intensity follows the inverse square law. A heater 6 inches from your back delivers approximately four times the therapeutic dose as the same heater 12 inches away, and sixteen times the dose at 24 inches. A single high-quality heater at the right distance is more therapeutically effective than four cheap heaters far away.
2. Coverage angle — your body has a surface area of roughly 18-22 square feet. Heaters on one wall cover maybe 30% of that. Heaters on all walls plus overhead cover 85-95%. The difference compounds over thousands of sessions.
3. Heater emissivity and peak wavelength — human tissue absorbs far infrared most efficiently at 7-10 microns. Our VantaWave® heaters are tuned to 7.9 microns. Generic Amazon panels peak at 8-12 microns with no quality control on wavelength consistency.
This is the engineering foundation that every construction decision builds on. It's why I don't start with 'buy lumber' — I start with 'understand the physics.'
Three paths: full DIY, SaunaCloud kit, or turn-key build
Path 1 — Full DIY: You source every component, design the layout, figure out heater placement. Cost: $3,500-$6,500. Time: 40-100+ hours. Risk: high — you're making engineering decisions without the knowledge base to evaluate outcomes.
Path 2 — SaunaCloud kit (our model): We design for your exact space using the Atlas™ system, manufacture and ship a complete kit (VantaWave® heaters, CORE 5™ power supply, WiFi control, pre-cut cedar, door, bench, hardware, plans). Your contractor builds in 1-3 days with our phone/video support. Cost: $5,000-$15,000+ kit plus $500-$2,000 labor plus $200-$800 electrician. Time: 8-12 weeks total. Risk: low.
Path 3 — Full turn-key: We provide the kit, your contractor handles everything. Cost: $8,000-$20,000+ installed. Hands-off except design decisions.
Space planning: where your sauna goes determines how it performs
Any space as small as 4×4 feet works. Minimum: 4×4 (1 person), 4×5 or 5×5 (2 person), 5×6+ (3+ people). Ceiling: 7-8 feet ideal, minimum 6.5 feet. Site within 50 feet of your electrical panel. Convenience matters — the Finnish longevity data is based on 4-7 sessions per week. Location affects compliance, which affects health outcomes.
What you DON'T need: special ventilation, plumbing, waterproof flooring, or a floor drain.
Framing and insulation: why infrared saunas need foil-facing
Standard 2×4 framing with R-13 insulation. The critical infrared-specific detail: foil-faced insulation on the interior side. Traditional saunas heat air — any insulation stops convective heat loss. But infrared energy is electromagnetic radiation that passes through standard fiberglass like light through a window. Without a reflective barrier, your heaters warm your neighbor's bedroom.
Foil-faced insulation reflects infrared back into the sauna. Without it: 35-45 min heat-up. With it: 12-18 min. I've fixed builds where the owner skipped foil facing. Average cost to redo: $3,200. The foil-faced insulation cost $150 more than standard at original construction.
Vapor barrier: 6-mil polyethylene on the warm side. Costs $50. Without it: mold in 6-12 months. Mold remediation: $10,000-$30,000. Non-negotiable.
Western Red Cedar: there's a reason we use nothing else
Clear-grade, kiln-dried Western Red Cedar tongue-and-groove. Naturally antimicrobial, dimensionally stable through thousands of heat cycles, aromatic, comfortable against bare skin. Read the full cedar guide →
What to avoid: Hemlock (warps, no antimicrobial). Basswood (degrades). Poplar (splits). Pine (sap). Plywood — ABSOLUTELY NOT. Urea-formaldehyde adhesives off-gas carcinogens when heated. You're building a detoxification chamber. Never seal, stain, or paint interior cedar.
Heater placement: the engineering that separates therapy from a warm room
The Atlas™ system positions VantaWave® panels on every surface: behind the back (lumbar, mid-back, upper back — three-zone coverage), beside the legs, overhead (halogen at ~750°F for supplemental top-down heat), and optionally in front.
For each build, we calculate exact mounting coordinates based on interior dimensions, bench position, and seated body geometry. This isn't 'mount them at 36 inches' — it's 'mount the lumbar panel so the center aligns with L3-L5 vertebrae at the bench depth of Y inches.' A 4-inch error misses the lumbar region entirely — reducing therapeutic effectiveness for every session for the life of the sauna.
Electrical: the most dangerous mistakes and how to avoid them
Do not do your own electrical work. I have seen burns, house fires, tripped breakers, and code violations that voided homeowners insurance. Hire a licensed electrician. $200-$800 is the cheapest insurance in the project.
Small builds: 120V/20A dedicated circuit. Larger models: 240V/30A or 50A dedicated circuit. 'Dedicated' means sauna ONLY. NEC classification: Article 424 (Fixed Electric Space Heating), NOT Article 422 (Appliances). If your inspector questions this, our code expert Chad speaks with them directly.
CORE 5™ architecture: takes main power input, distributes to individual heater zones with temperature-regulated control, integrates WiFi for app-based management, provides overcurrent protection at the heater level. Your electrician connects the main feed; CORE 5™ handles everything downstream.
The control system: more than a thermostat
A proper system manages: multiple heater zones independently, temperature sensing at the occupant position (not the ceiling), timed sessions with pre-heat capability, power distribution preventing inrush current spikes, and safety shutoff. The CORE 5™ is engineered for VantaWave® specs — power curve, thermal response, optimal voltage. Generic Amazon heaters + generic thermostat = generic results.
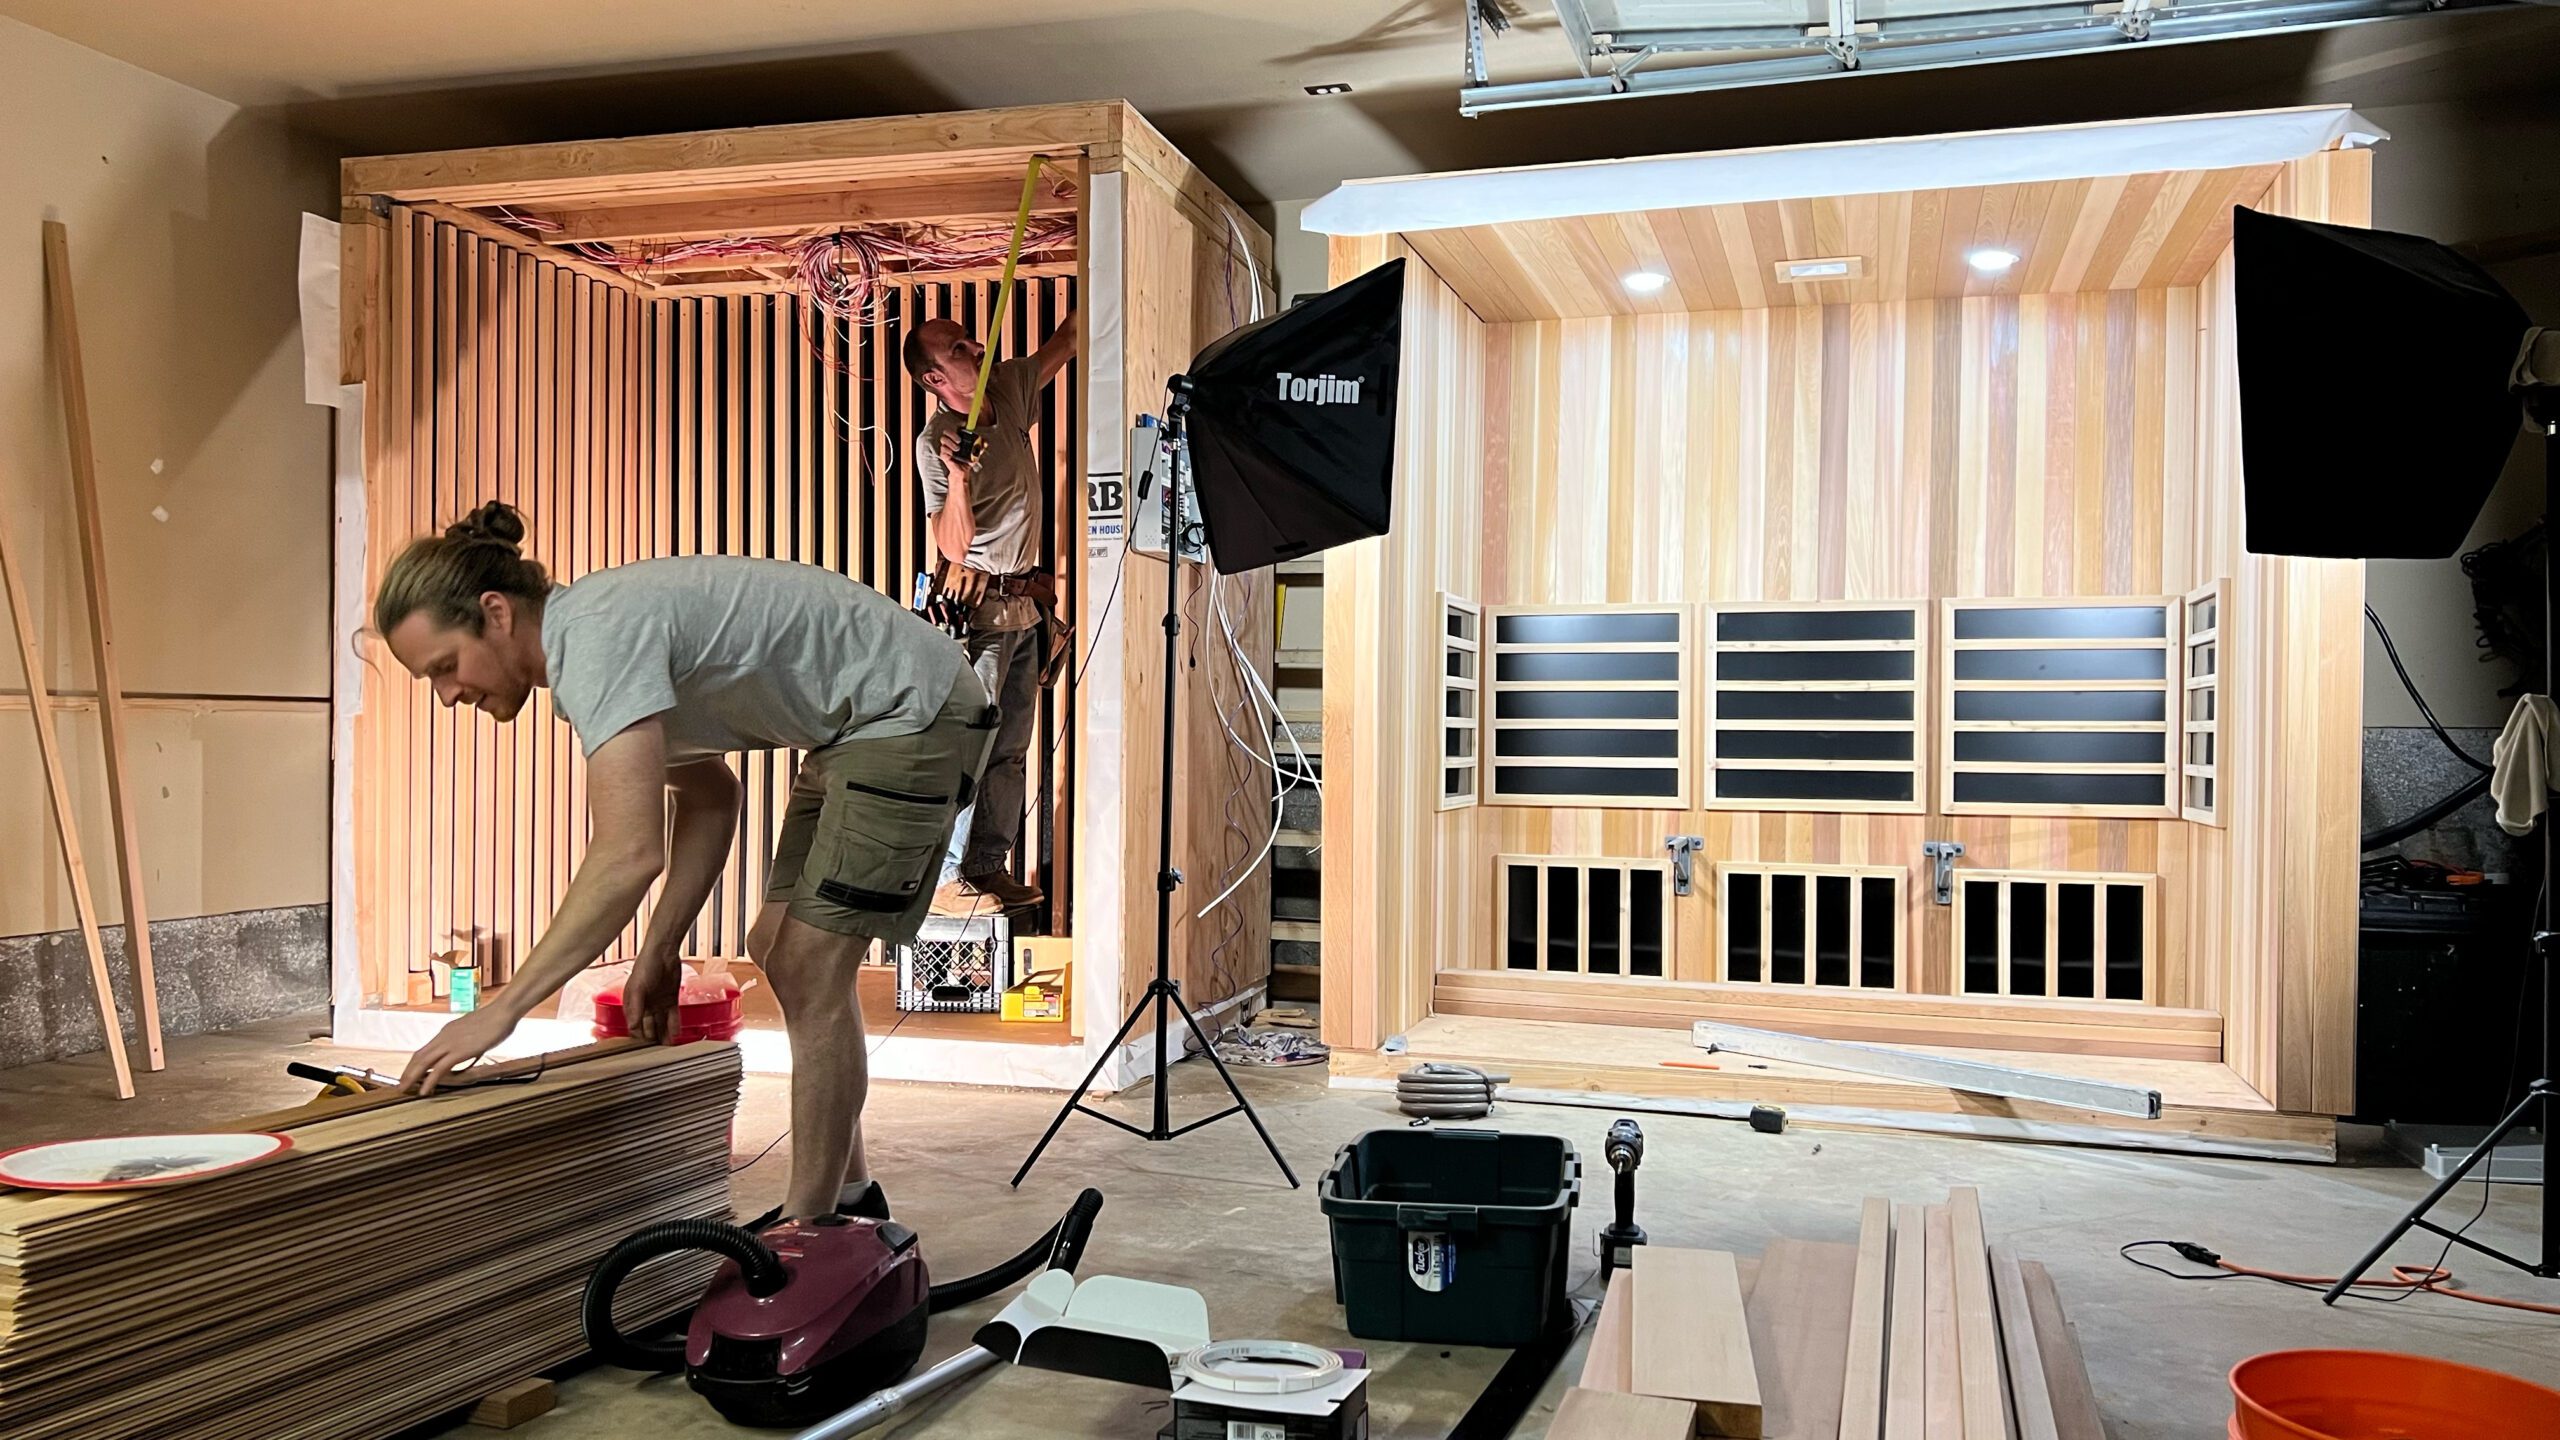
Watch the build process: our 30-clip video series
We've published a 30-clip video series documenting every step of a commercial-grade installation — from 240V rough-in to seamless cedar paneling. Same methods used in our Cavallo Point, Westin, and Marriott installations. Use it to preview the process, reference during construction, and verify your contractor's work.
Bench design and red light therapy integration
Single bench (22" deep) for 1-2 person. Height: 18 inches — optimal for heater coverage geometry. Red light therapy (660nm + 850nm) integrates directly into the bench at 2-6 inch clinical proximity. Clinical research requires panels within 2-6 inches — wall-mounted panels at 24" deliver ambient light, not therapy. Optional — wiring provisions included in every plan for future retrofit.
What's in every SaunaCloud kit
- VantaWave® heater panels (7.9μm peak, <0.20 mG EMF)
- CORE 5™ power supply (engineered for your configuration)
- WiFi control module (temp, timer, preheat from phone)
- Pre-cut Western Red Cedar tongue-and-groove
- Bench components with furniture-grade hardware
- Full tempered glass door assembly
- All mounting hardware for heater panels
- Architectural plans + electrical wiring diagrams
- Phone and video support throughout installation
Timeline, cost, and the real comparison
SaunaCloud kit: 8-12 weeks total. $5,000-$15,000+ kit + $500-$2,000 labor + $200-$800 electrician = $6,000-$17,000 installed. 7-year warranty. Full engineering support.
Full DIY: $3,500-$6,500 materials, 40-100+ hours, 90-day component warranty max, zero engineering support, high risk of costly mistakes.
Quality prefab: $3,000-$8,000, fixed dimensions, imported components, 1-5 year warranty. Fast but limited. Compare our sauna models to see which approach fits your space, or start here for a free consultation.
The five mistakes that cost DIYers the most money
1. DIY electrical ($2,000-$5,000 to fix). I've seen homeowners wire to a 15A bedroom circuit, then 'fix' tripping by upsizing the breaker on undersized wire — a genuine fire hazard.
2. Standard insulation without foil facing ($2,500-$4,000 tearout). The foil-faced upgrade costs $150 at construction. The fix costs $3,200.
3. Cheap heaters (can't be fixed without full replacement). Generic Amazon panels: 140°F surface temp, 20-100 mG EMF, 3-5 year lifespan, no wavelength control. Over 5,000+ sessions across 15 years, reduced therapeutic benefit per session is incalculable.
4. No vapor barrier ($10,000-$30,000 mold remediation). The barrier costs $50.
5. Poor heater placement (permanent — structural). Heaters on one wall only, wrong height, no overhead element. Can't be fixed without opening walls.
Frequently Asked Questions
8-12 weeks total: 1-2 weeks design, 6-8 weeks fabrication and shipping, 1-3 days contractor installation. Phone and video support throughout.
A licensed electrician MUST handle all electrical — non-negotiable. Most customers hire a general contractor for the full build. Our plans are detailed enough for a competent handyman.
Small builds: 120V/20A dedicated circuit. Larger models: 240V/30A or 50A dedicated circuit. We provide complete electrical specs and wiring diagrams.
Yes — one of our most common installations. Minimum 4×4 feet interior. Our video series shows a closet conversion in detail.
SaunaCloud's code expert Chad handles inspector questions directly. Custom infrared saunas fall under NEC Article 424 (Fixed Electric Space Heating), not Article 422 (Appliances). We've resolved hundreds of these conversations.
Prefab works if standard sizes fit your space. Custom gives you precise fit, VantaWave® performance, red light at clinical proximity, and a 7-year warranty. Most people who call us start shopping prefab and realize they want better.
Yes — every set of plans includes wiring provisions and mounting locations even if you don't order RLT initially. Retrofitting requires minimal modification.
The $3,000 DIY uses generic heaters (no wavelength control, high EMF, 90-day warranty, zero placement engineering). The $6,000 kit uses VantaWave® (7.9μm, <0.20 mG, 7-year warranty, Atlas™ placement, CORE 5™ power, phone/video support). Over 300+ sessions/year for 15+ years, the per-session cost difference is pennies but the therapeutic difference is significant every session.
Founder & Lead Designer, SaunaCloud®
3,000+ custom saunas built since 2014 · Author of The Definitive Guide to Infrared Saunas · Featured in Forbes, Inc., and MSN
Chris has been designing and building custom infrared saunas since 2014. He wrote one of the first comprehensive books on infrared sauna therapy and is personally involved in every SaunaCloud build — from design consultation through delivery and beyond.
Continue Reading

How Infrared Saunas Work: From Photon to Health Effect in Five Steps (2026)
Read articleInfrared Sauna Heater Comparison: Carbon vs Ceramic vs Halogen vs VantaWave® (2026)
Read article
Outdoor Infrared Saunas: The Complete Planning & Installation Guide (2026)
Read articleReady to Start Your Custom Build?
Book a free design consultation — send us your space measurements and we'll create a custom plan with engineered heater placement.