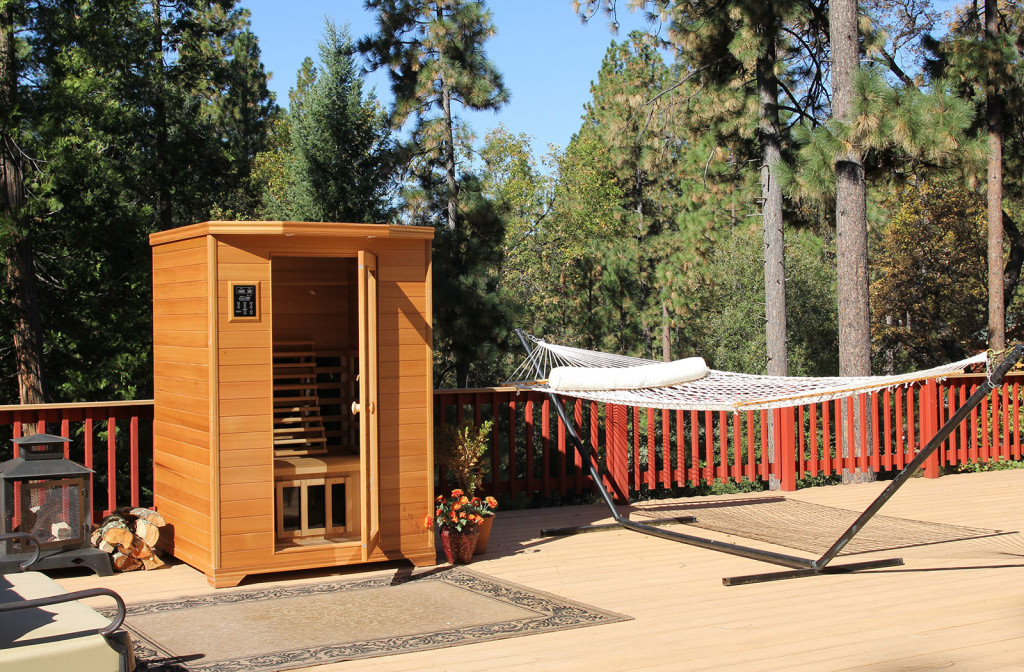
Outdoor Infrared Sauna Setup: Real-World Lessons from Years of Experience
Setting up an outdoor infrared sauna ranks among the best wellness decisions I’ve ever made—but it didn’t come without learning some expensive lessons along the way. After years of running saunas outside through scorching summers, freezing winters, and everything in between, I’ve discovered what actually matters versus what the marketing materials claim matters.
This guide cuts through the theory and provides you with the practical knowledge you need to avoid the mistakes that have cost me time, money, and frustration. Whether you’re moving an existing sauna outdoors or planning an outdoor infrared sauna installation from scratch, these real-world insights will save you headaches and help you create a setup that actually works year-round.
The Reality Check: What Nobody Tells You About Outdoor Sauna Ownership
Before we dive into solutions, let’s talk about what outdoor sauna life actually looks like—beyond the Instagram-worthy photos of morning steam rising against mountain backdrops.
The Good:
The experience truly is transformative. There’s something about stepping into warmth while surrounded by fresh air that indoor saunas cannot replicate. Rain on the roof, birds at dawn, stars overhead, seasonal changes—these aren’t minor aesthetic bonuses. They fundamentally change how you experience heat therapy. Sessions feel less clinical and more restorative. You actually look forward to them instead of treating them like another wellness task.
Temperature extremes amplify benefits. Winter sessions create incredible temperature contrast—from 20°F outside to 150°F inside. This thermal stress appears to enhance cardiovascular benefits and make sessions feel more satisfying. Summer morning sessions let you watch the sunrise while staying comfortably warm before the heat becomes oppressive.
The Hard Truth:
Outdoor saunas demand more from you. They require regular maintenance; indoor units are never exposed to. Canvas covers need adjustment after the wind. Snow must be cleared after storms. Moisture management becomes an ongoing concern rather than a one-time setup task. You can’t just turn it on and forget it exists.
Weather impacts performance significantly. That 30-minute preheat time in your climate-controlled basement becomes 60-90 minutes on a February morning. Summer afternoon sessions might require lower temperatures or timing adjustments. Your sauna becomes subject to weather patterns whether you like it or not.
Initial costs run higher than expected. Beyond the sauna itself, you will need proper electrical installation (typically $1,500-$ 3,000), foundation work ($500-$ 2,500), weatherproofing supplies ($200-$ 500), and accessories such as quality covers ($200-$ 600). Budget 30-40% above sauna cost for complete installation.
For detailed guidance on whether outdoor placement makes sense for your situation, review our comprehensive article on outdoor infrared sauna feasibility: https://saunacloud.com/wondering-if-your-infrared-sauna-can-be-used-outdoors-discover-the-best-practices-heater-requirements-power-setup-and-weatherproofing-tips-for-safely-placing-a-sauna-outside-plus-how-to/
Mistake #1: Assuming Any Sauna Works Outside (It Doesn’t)
My first outdoor sauna was a mid-range indoor model that I moved to the backyard. Within eight months, I had warped panels, electrical issues, and constant maintenance problems. Here’s what I learned the hard way:
Indoor saunas lack critical outdoor features:
Indoor models utilize standard wood joinery, which is adequate for climate-controlled environments. Outdoor exposure causes expansion and contraction cycles that stress these joints, creating gaps that allow heat to leak and moisture to enter. The glues and adhesives used in indoor saunas aren’t rated for exposure to temperature extremes or high moisture levels, which can lead to separation and failure.
Electrical components in indoor units aren’t sealed against humidity. Morning dew, rain splash, and temperature-related condensation create moisture exposure that indoor components can’t handle. Control panels fog up, connections corrode, and power supplies fail prematurely.
What actually works outdoors:
Look for saunas explicitly rated for outdoor use with these features:
- Marine-grade joinery: Tongue-and-groove with sealant, not just friction fit
- Weatherproof electrical boxes: NEMA-rated enclosures, not standard indoor boxes
- UV-resistant finishes: Multiple coats of UV-blocking clear coat, reapplied annually
- Expanded temperature range components: Electronics rated for -20°F to 150°F operation
- Moisture barriers: Proper vapor barriers prevent condensation in wall cavities
- Stainless hardware: All fasteners, hinges, and handles resist corrosion
Authentic outdoor saunas cost 20-30% more than equivalent indoor models, but this premium prevents the cascading failures I experienced with my repurposed indoor unit.
Mistake #2: Underestimating Cold Weather Heater Requirements
Nothing frustrates me quite like waiting 90 minutes for my sauna to reach the right temperature on a winter morning. I learned this lesson during my first Midwest winter, when I had the opportunity to use an outdoor sauna.
The standard heater problem:
Most infrared saunas ship with a heater capacity appropriate for indoor use—typically 1500-2000 watts total—these struggle when fighting 0°F ambient temperatures. The math is brutal: you’re trying to create a 150°F temperature differential, not the 70°F differential indoor units face.
Carbon panel heaters prove especially inadequate outdoors. Their lower surface temperatures (around 140-160°F) don’t deliver enough heat energy to overcome cold ambient temperatures. You’ll eventually achieve the target temperature, but “eventually” means 75-120 minutes of preheating.
What actually works in cold climates:
For regions with extended freezing weather, target a minimum heater capacity of 3000-3500 watts. This typically requires:
- Six to eight infrared panels instead of the standard four to six
- Full-spectrum heaters running hotter than basic carbon panels
- Strategic placement ensuring even heat distribution
- Possible upgrade to 240V power for sufficient electrical capacity
I eventually upgraded my setup to a total capacity of 3600 watts across eight panels. Winter preheat time dropped from 90+ minutes to 35-45 minutes—the difference between actually using my sauna and letting it sit idle because I couldn’t justify the wait.
The surprising summer challenge:
Interestingly, excessive heater capacity creates summer problems. A sauna calibrated for winter performance becomes uncomfortably hot during summer afternoons. You need either:
- Smart controls allowing you to turn off heater zones seasonally
- Red light therapy capability for heat-free sessions (more on this later)
- Disciplined timing—early morning or evening sessions only
Learn more about heater technology options in our guide comparing different infrared heater types: https://saunacloud.com/infrared-sauna-heater-comparison/
Mistake #3: Treating Weatherproofing as Optional
I initially resisted buying a heavy-duty sauna cover. “It’s cedar—it’s naturally weather-resistant!” I rationalized. That mindset cost me a refinishing job within two years.
UV damage happens faster than you think:
Direct sunlight attacks wood in ways rain never will. UV radiation breaks down lignin (the compound that binds wood fibers together), causing surface deterioration, fading, and eventual structural weakening. This process accelerates at high altitude and in southern latitudes where UV intensity peaks.
My sauna’s south-facing side showed dramatic fading and surface checking within 18 months of unprotected exposure. The north side looked nearly new. The lesson was clear—UV protection matters more than waterproofing.
Effective weatherproofing strategies:
Quality covers are non-negotiable: Invest in marine-grade canvas covers with UV-blocking coatings for optimal protection. Lighter colors (tan, beige) reflect sunlight better than dark colors. Ensure a proper fit—covers that cover a gap or flap in the wind cause more problems than they solve.
Strategic placement reduces exposure: Position saunas where they receive partial shade during peak UV hours (10 am-4 pm). Deciduous trees provide ideal protection—summer shade, winter sun after leaf drop.
Annual maintenance schedules: Plan on resealing exterior wood annually. This isn’t optional maintenance—it’s mandatory preservation. Use marine-grade, UV-blocking clear coats, applying 2-3 coats according to the manufacturer’s specifications.
Elevation prevents ground moisture: Keep the sauna base at least 6 inches above ground level. Ground contact guarantees rot regardless of wood quality. Use concrete blocks, pressure-treated lumber platforms, or permanent foundations.
The Hidden Challenge: Managing Electrical Installation
Outdoor electrical work involves challenges that indoor installations never face. I learned this during my electrical inspection, which revealed code violations I hadn’t anticipated.
What seems straightforward but isn’t:
You cannot simply run an extension cord from your house to an outdoor sauna. Code requirements mandate:
- Dedicated circuits: No shared loads on sauna circuits
- GFCI protection: Ground fault circuit interrupters for all outdoor receptacles
- Weatherproof conduit: All wiring must run through proper conduit, not simply buried or surface-mounted
- Proper disconnect: Accessible shutoff switch within sight of sauna
- Correct wire gauge: Undersized wire causes voltage drop, heating, and fire risk
The permit reality:
Most jurisdictions require electrical permits for outdoor sauna installations. DIY electrical work typically violates code and voids both sauna warranties and homeowner insurance coverage. Budget $1,500-$3,000 for licensed electrician installation, including permit fees.
Planning reduces costs:
Site your sauna within 50 feet of your main electrical panel. Every additional foot of wire run increases material and labor costs. Consider electrical access during site selection, not as an afterthought.
Some outdoor areas already have weatherproof outlets, such as hot tub circuits, outdoor lighting circuits, and landscape feature power. Verify these circuits have adequate capacity before assuming you can use existing infrastructure.
Integrating Red Light Therapy: The Game-Changing Upgrade for Outdoor Infrared Sauna Use
Adding red light capability to my outdoor sauna transformed how I use it year-round. This upgrade warrants a detailed explanation because it addresses several outdoor sauna challenges while providing significant therapeutic benefits.
The science behind red light and near-infrared therapy:
Red light (630-700nm wavelengths) and near-infrared light (700-1100nm wavelengths) trigger photochemical reactions in cells, distinct from the effects of infrared heat. When these wavelengths penetrate tissue, they’re absorbed by mitochondrial chromophores—particularly cytochrome c oxidase in the electron transport chain.
This absorption enhances mitochondrial function, significantly boosting ATP (cellular energy) production. Research documents increases up to 200% with proper dosing. For tissues stressed by training, injury, or chronic conditions, this ATP boost provides crucial repair fuel.
Additional mechanisms include:
- Nitric oxide modulation: Improves microcirculation independent of heat-induced vasodilation
- Reduced inflammation: Modulates cytokine expression through pathways separate from heat therapy
- Enhanced collagen synthesis: Supports skin, connective tissue, and cartilage health
- Accelerated muscle recovery: Reduces delayed onset soreness and speeds return to activity
- Improved mood and energy: Supports mitochondrial function in brain tissue
For comprehensive details on combining red and infrared therapies, see our guide to red light infrared saunas: https://saunacloud.com/red-light-infrared-sauna/
Why red light matters specifically for outdoor saunas:
Summer heat management: When ambient temperatures reach 85-90°F or higher, adding sauna heat becomes uncomfortable or even dangerous. Red light therapy provides therapeutic benefits without thermal stress. I use pure red light sessions throughout the summer while reserving combined heat therapy for cooler weather.
Faster sessions: Some mornings, I want recovery benefits but lack time for full heat therapy sessions. Fifteen-minute red light treatments deliver meaningful benefits without requiring long preheat times or post-session cool-down periods.
Energy efficiency: Red light draws 100-300 watts versus 2000-4000 watts for infrared heaters. On days when I need multiple sessions or when electricity costs are high, red light provides a more economical therapy option.
Red light bench integration: Why position matters critically:
The most effective outdoor sauna red light setups integrate LED panels directly into benches, positioning lights 2-4 inches from skin during regular seating.
Light intensity follows the inverse square law—doubling the distance from the source reduces the intensity by a factor of 4. Wall-mounted panels 18-24 inches from the skin deliver only 20-25% of the therapeutic dose compared to bench-integrated systems at a 3-inch distance.
Outdoor-specific red light considerations:
Temperature extremes affect LED performance. Consumer-grade LED panels often fail in cold weather because semiconductor behavior changes at extreme temperatures. Quality outdoor installations use:
- Industrial-grade LEDs rated for -40°F to 150°F operation
- Sealed LED housing prevents moisture intrusion
- Temperature-compensated drivers maintaining consistent output
- Conformal coating on circuit boards for humidity protection
Standard indoor red light panels will fail prematurely in outdoor environments. Invest in components explicitly rated for outdoor temperature ranges.
Using red light without heat: Practical protocols:
I discovered red-light-only sessions provide unique benefits worth scheduling separately from traditional heat therapy:
Post-workout recovery (summer): After morning exercise, when body temperature remains elevated, cold red light therapy provides recovery benefits while allowing natural cooling. Twenty-minute sessions at ambient temperature deliver muscle recovery without thermal stress.
Skin-focused treatments: For users prioritizing aesthetic benefits—such as collagen production, wrinkle reduction, and skin tone improvement—red light at comfortable temperatures allows for longer sessions (25-30 minutes) than combined heat therapy permits.
Daily consistency: Some days I want therapeutic benefits but not full sauna sessions. Red light provides “maintenance” therapy that’s easier to fit into busy schedules, supporting consistency.
Practical implementation:
I schedule combined heat and light sessions three times a week for comprehensive benefits, supplemented by two to three standalone red light sessions weekly for recovery and skin health. This approach maximizes therapeutic benefits while accommodating schedule constraints and weather conditions.
Seasonal Optimization: What Actually Works Throughout the Year
Outdoor saunas face dramatically different challenges across seasons. Here’s what I’ve learned about year-round optimization:
Winter strategy (below 32°F):
- Extended preheat: Start warming 60-90 minutes before use; smartphone remote control is essential.
- Snow management: Clear the roof after heavy snowfall; heavy snowfall can damage structures and melt downward into electronics
- Insulated pathways: Maintain clear, safe access routes; heated walkway mats are worth the investment
- Door seal maintenance: Check gaskets monthly; cold makes rubber brittle
- Post-session protocol: Leave the door cracked for 15 minutes to prevent interior condensation from rapid cooling
- Enjoy the contrast: Winter offers the best temperature differential; sessions feel incredibly satisfying.
Summer strategy (above 85°F):
- Timing matters: Early morning (before 8 am) or evening (after 8 pm) sessions avoid peak heat
- Reduce target temperature: 130-140°F provides adequate benefits without excessive thermal stress
- Red light sessions: Use phototherapy without heat during the hottest periods
- Increased ventilation: Open roof vents; crack the door if comfortable
- Hydration emphasis: Preload with 16-24oz water; keep cold water accessible during sessions
- Embrace alternatives: Some days are too hot for sauna use; don’t force it
Spring/Fall optimization:
- Perfect conditions: Moderate temperatures make this prime sauna season
- Deep cleaning: Early spring and late fall provide ideal timing for thorough maintenance
- Seal inspection: Check all weatherproofing before extreme weather seasons
- Enjoy comfort: These months offer the most pleasant conditions with the least accommodation
Weather-responsive scheduling:
I’ve learned to adjust sessions based on actual conditions rather than rigid schedules. Rainy days offer excellent sessions, accompanied by the sound of rain on the roof. Clear, cold nights provide incredible stargazing during cool-down periods. Windy days warrant skipping sessions or timing them during calmer periods.
Solving Common Outdoor Infrared Sauna Problems
After years of outdoor use, I’ve encountered and solved most common issues:
Problem: Excessive preheat times
Solution: Add supplemental heaters, improve insulation, or upgrade to higher-wattage panels. Also, check door seal integrity—heat loss through gaps dramatically extends preheat duration.
Problem: Moisture accumulation inside
Solution: Improve ventilation, extend post-session door-open time, and ensure proper foundation drainage. Consider adding desiccant packs in corners to absorb residual moisture.
Problem: Electronics failure
Solution: Verify all electrical components are properly sealed and rated for outdoor use. Add secondary weather protection over electrical boxes. Consider upgrading to commercial-grade components.
Problem: Wood fading/damage despite cover
Solution: Covers alone aren’t sufficient—combine with a UV-blocking clear coat that is reapplied annually. Also, verify the cover actually blocks UV (many cheap covers don’t).
Problem: Inconsistent temperature
Solution: Check heater functionality; panels degrade over time. Verify even heat distribution; add or relocate panels as needed. Consider upgrading the controller for better temperature stability.
For additional troubleshooting and maintenance guidance, explore our resources on how infrared saunas work: https://saunacloud.com/how-infrared-saunas-work/
The Custom Outdoor Sauna Option: When It Makes Sense
After struggling with an adapted indoor sauna, I eventually commissioned a custom outdoor build. In certain situations, custom design offers significant advantages.
When custom makes sense:
- Unusual spaces: Non-standard dimensions, odd shapes, or challenging site conditions
- Specific feature requirements: Integrated red light, custom bench configurations, specific heater placement
- Climate extremes: Designs optimized for your exact location’s temperature ranges, UV intensity, and precipitation patterns
- Aesthetic integration: Matching existing structures, complementing landscape architecture
- Long-term investment: Planning to use sauna daily for 15- 20+ years
Custom design advantages:
Custom builds optimize everything for your specific situation. Foundation design takes into account your site’s drainage patterns. Insulation specifications match your climate’s temperature extremes. Heater capacity calibrates for your coldest winter temperatures. Window placement maximizes your best views while minimizing UV exposure.
I don’t regret going custom despite higher upfront costs. The result performs flawlessly in conditions that challenged my previous setup. Every detail works correctly because it was designed specifically for my property, climate, and usage patterns.
Learn about custom options: https://saunacloud.com/custom-infrared-sauna/
The DIY alternative:
Skilled builders can successfully execute DIY outdoor sauna projects, although outdoor builds present distinct challenges that differ from those of indoor installations. If you have advanced carpentry skills, a solid understanding of building science, and are willing to commit to thorough research, DIY can save 30-40% compared to professional installation.
However, mistakes prove expensive. My first attempt cost more in corrections than professional installation would have cost initially. Unless you’re confident in your skills across multiple trades (such as carpentry, electrical, roofing, and waterproofing), professional installation provides better value.
For those considering DIY approaches: https://saunacloud.com/diy-infrared-sauna/
The Investment Perspective: Is Outdoor Worth the Extra Effort?
Let me be direct: outdoor saunas require more work, cost more initially, and demand ongoing maintenance. Indoor units don’t. So why do it?
The experiential difference justifies everything:
I’ve owned both indoor and outdoor saunas. The indoor unit was more convenient, required less maintenance, and performed more consistently. However, I used the outdoor unit three times more frequently because sessions felt qualitatively different—more restorative, less clinical, and genuinely enjoyable rather than merely beneficial.
When wellness practices feel good, you maintain them consistently. When they feel like obligations, you eventually abandon them. My outdoor sauna transformed heat therapy from something I “should do” into something I genuinely look forward to.
The compound benefits:
More frequent use means better results. The cardiovascular benefits, detoxification, pain relief, stress reduction, and recovery enhancement all scale with consistency. If outdoor placement increases your usage from 2 times weekly to 5 times weekly, you’re receiving 2.5 times the therapeutic benefits, despite higher installation costs.
Property value considerations:
Quality outdoor wellness structures typically enhance property value. Well-designed outdoor saunas appeal to health-conscious buyers and can differentiate your property in competitive markets. While exact value increases vary by location and execution quality, many real estate professionals report a minimum of 50-75% cost recovery, with premium installations sometimes exceeding the initial investment.
The break-even calculation:
Commercial spa sessions cost $30 to $ 60 per visit. If outdoor placement increases your usage to 200+ sessions annually, versus 100 sessions you’d do indoors, you’re gaining 100 sessions worth $3,000-$ 6,000 in commercial equivalent value. The incremental outdoor costs ($3,000-5,000 typically) break even within one year through increased usage alone.
Final Recommendations: Making the Right Choice
After years of outdoor sauna ownership, here’s my honest guidance:
Go outdoors if:
- You have suitable space with proper sun exposure, foundation options, and electrical access
- You’re committed to regular maintenance (monthly inspections, annual sealing, weather management)
- You’ll actually use the outdoor experience benefits (nature connection, fresh air, seasonal variety)
- You can invest 30-40% above the basic sauna cost for proper outdoor installation
- Your climate doesn’t create extreme challenges (under 150 days below freezing, manageable UV exposure)
Stay indoors if:
- Convenience matters more than experience
- Maintenance commitment sounds burdensome
- The weather doesn’t particularly appeal to you
- Electrical or foundation costs prove prohibitive
- Extreme climate creates overwhelming challenges
The truth:
Outdoor saunas aren’t for everyone. They demand more from owners in exchange for more rewarding experiences. I don’t regret a single aspect of my outdoor setup despite the challenges, costs, and maintenance. The experience enhancement justifies everything.
However, I’m someone who values a connection to nature highly, doesn’t mind regular maintenance, and uses my sauna 5-6 times a week. If that doesn’t describe you, there’s no shame in choosing the more convenient indoor option. The best sauna is the one you’ll actually use consistently—whether that’s indoors or outdoors depends on your priorities.
For more guidance on making this decision: https://saunacloud.com/can-you-put-your-infrared-sauna-outside/
Conclusion: Making Peace with Trade-Offs
Every outdoor infrared sauna owner eventually comes to terms with certain realities. Yes, winter preheat takes longer. Yes, you’ll spend time managing covers and clearing snow. Yes, maintenance demands more attention than indoor alternatives.
But those foggy morning sessions watching the sunrise. Those rainy evening sessions listening to drops on the roof and those winter nights looking at stars during cool-down. Those experiences are not available with indoor installations.
The question isn’t whether outdoor placement requires more effort—it absolutely does. The question is whether the experience enhancement justifies that effort for you personally. After years of owning an outdoor sauna, my answer remains an emphatic yes. But your answer should be based on an honest assessment of your priorities, not marketing promises or idealized images.
If you decide outdoor placement suits your situation, do it right from the start. Invest in proper installation, appropriate equipment, and necessary weatherproofing. The upfront investment pays dividends through years of reliable performance and genuinely transformative wellness experiences.
Your future self, relaxing in therapeutic warmth while surrounded by nature, will thank you for making the effort.